

5 Tips for Sowing Small Seeds
Gardening season is in full swing, and that means planting lots of little seeds in your garden. Direct sowing is the best way to end up with lots of healthy plants in your vegetable garden—no transplant shock, no complicated seed starting setup. But a lot of us get direct sowing wrong by planting our seeds too close together or pushing them way too deep into the soil.
I've got a couple tricks up my sleeve to make direct seeding a bit easier and more enjoyable. And you don't need to buy anything (except the seeds, of course!). My favorite tricks use everyday items you've got lying around the house (including one item in your bathroom).
These tricks are great for all those itty bitty seeds—basil seeds, lettuce seeds, arugula seeds, spinach seeds, carrots seeds, mustard seeds, and more. They'll help you get the spacing right every single time!
2 Quick Tips Before We Get into the Tricks
Before sowing seeds, do a little soil prep. Use a small rake to remove leaves and other debris from your soil surface. I recommend following that up with a 2- to 3-inch-thick layer of fresh compost and some worm castings. Rake the garden bed again to get a nice, flat planting surface to work with.
In this post, I'll talk about sowing seeds at the correct depth. Here's a good way to know the depth your seeds should be buried at: It's about twice the width of the seed. So if your seeds are about 1-inch wide, you want to plant them about 2 inches deep. If your seeds are half an inch wide, you only want to plant them 1 inch deep. For the smallest seeds (like lettuce seeds), you really don't want to bury them at all. You'll just "surface sow" them, which means press them into the surface of the soil so they have good soil contact.


Seed Sowing Tricks
Make DIY Seed Tape with Toilet Paper
This might surprise you, but toilet paper can be your new best friend in the garden. Use toilet or tissue paper to make your own seed tape. This is a really fun project to do with kids; they love the silliness of playing with TP outside.
Follow these steps to make your own seed tape:
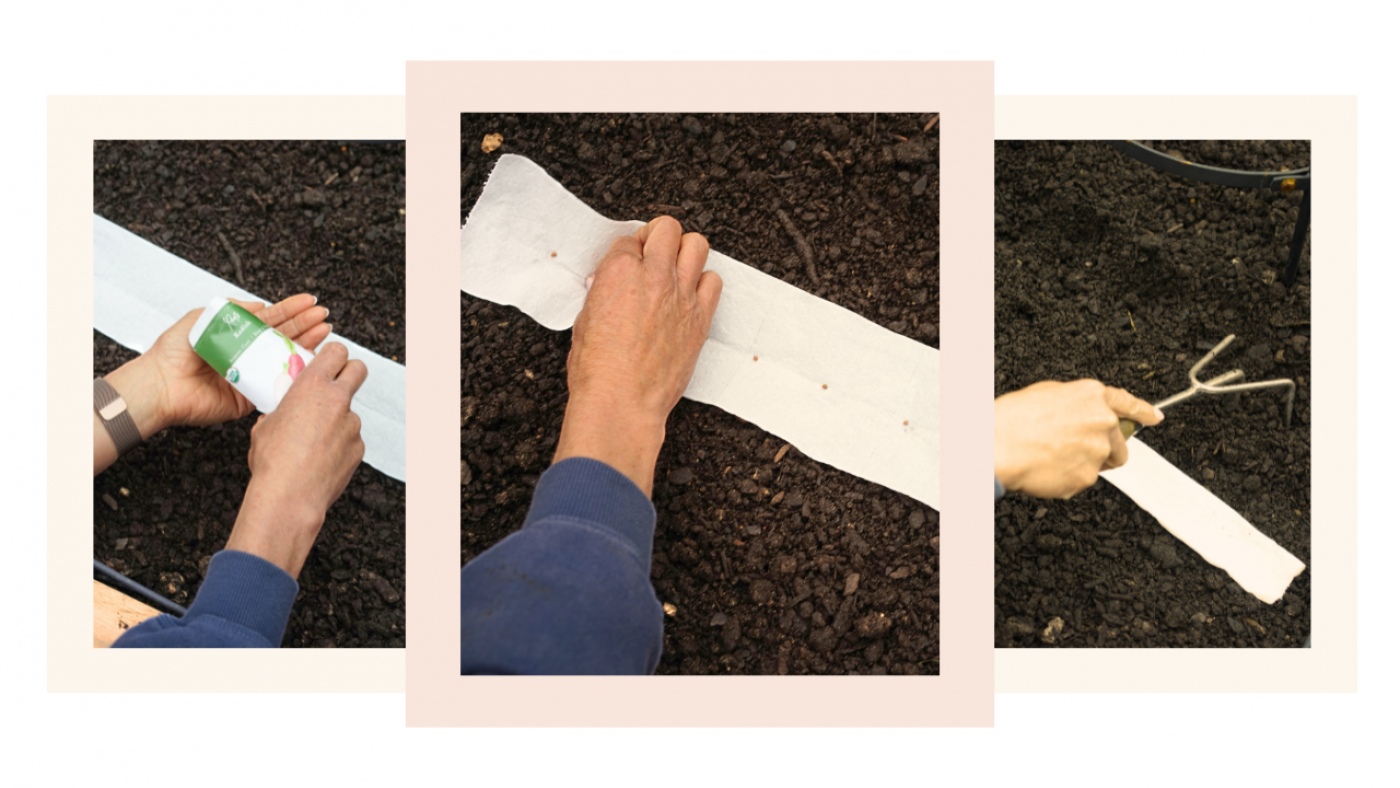
- Start by making a biodegradable sticky paste by mixing 1 part flour to 1 part water. You'll use this in lieu of glue to hold your seed tape together.
- Lay out a strip of toilet paper to the correct length. If you're planting a full row of something, this might be the length of your garden bed.
- Place a dab of your sticky paste at the correct spacing for the type of seed you're sowing, all down the length of the paper. Go back and place a seed on each little dab. (Use tweezers to help you pick up tiny seeds. Sometimes I'll lick my finger to help me pick up a couple seeds at a time.)
- Fold the paper in half lengthwise and use water or your sticky paste to close up the edges of the paper.
- Roll up the seed tape until you're ready to plant. You can use a leftover cardboard tube if you have one handy.
When it's time to plant, all you have to do is unroll the seed tape and cover it up with a thin layer of soil. (Depending on how deep the seeds should be sown, you may need to dig a shallow trench first.) Water the planting area, and voila! Your seeds should sprout in no time (unless they're carrot seeds).
Using the seed tape ensures, one, your seeds aren't buried too deep because the paper makes it easy to see just how far down they're going, and two, your seeds are properly spaced. You'll have plenty of room between each and every seed so that each plant can grow to its full potential.

Alternative:
You can buy premade seed tape, sometimes called seed bands. Some seed companies will sell tape with seeds like carrots already spaced for you. (Just search "carrot tape".) You'll pay considerably more for your seeds, but all you have to do is unroll the tape and then keep the garden area watered while you're waiting on your seeds to germinate.
Use Muffin Tins for Perfect Seed Spacing
Who would have thought a baking item could be a useful seed planting tool? Muffin/cupcake tins are perfect for creating a nice little planting grid, especially if you're planting a lot of seeds in one area. Use a smaller tin (like a 24-cup mini-muffin pan) for plants like lettuce, spinach, radishes, and carrots. Use a larger tin (like a 12-cup muffin pan) for plants like basil or bush beans.
All you have to do is take your muffin tin and place it on level soil. Push it gently into the soil so that the depth of the tin is the same depth as you need for your seeds. When you pull up the tin, you'll have a perfect little grid that allows you to properly space your seeds. Just drop one seed into the middle of each indentation.
Alternative:
You can buy seeding squares or planting boards online to help you space out and sow seeds.


Sprinkle Seeds with a Salt Shaker
A cleaned-out spice shaker is my favorite seed planting tool. The little holes in the top allow a few seeds to come out at a time, so you can simply shake the container over your garden space. It helps you spread seeds out, especially really tiny seeds that are hard to grasp between your fingers.
This method is great for small seeds you can broadcast, like lettuce seeds, arugula seeds, and carrot seeds. Since these seeds are so small, they do best when sown right on the surface of the soil. That means you don't need to worry about digging holes. Just shake out your seeds across the planting area, and then use your hand to gently press them into the soil so they have good contact. You can sprinkle a light layer of soil or compost on top if you'd like. Or you can use a small hand rake to lightly cover the seeds with soil.
Note that if you sow carrots this way, you'll need to come back in once they've germinated to do some thinning.


Alternatives:
You can buy cheap little gadgets called hand seed sowers that limit the flow of seeds. Most products have notches you can control for different sizes of seeds. I've tried one, and to be honest, I didn't love it. My seed sower kept shooting out three seeds when I only wanted one.
You could also make your own seed sower by cutting off the corner of an envelope. Fill the envelope with seeds, and then tap the cut corner of the envelope against the soil when you want to release a seed.
Use Sand to Better Distribute Seeds
The sand planting method is my favorite way to sow lots of seeds. It helps you quickly broadcast seeds over a large planting area. Mix coarse sand (like paver sand) with your seeds in a bowl (I use about a tablespoon of sand for every pinch of seeds). Use your hand or a trowel to shake the mix over your bed.
Sand, by the way, is a great soil amendment to add permeability and improve drainage. When you're planting, the light color of the sand in contrast to the dark soil helps you see where you've already sown seeds. The large sand particles also act like a filler to help you spread out your seeds better, instead of having large clumps of seeds here and there.
I use this method for sowing zinnias in my pollinator garden. I also use it to sow lettuce and arugula seeds over my salad garden beds. You can even use it for root crops like beets, carrots, and radishes. (Again, you may need to come back and thin root crops later.)
If you want to space your seeds out a bit more, you could combine this hack with the last one by mixing your seeds and sand in a salt shaker.
Alternative:
I've heard of some gardeners using cornmeal as a filler instead of sand. I prefer sand because it's great for your garden soil.


Grab a Seed Spacing Ruler
Seed spacing rulers take the fuss out of spacing seeds.
You can easily make your own. Just grab a yardstick or a wooden ruler, and drill a hole at every inch mark along the ruler. Use the holes to space your seeds accordingly—every inch for lettuces, every 2 inches for radishes, every 3 inches for carrots, every 4 inches for beets, etc.
Once you've sown your seeds, use the edge of the ruler to press them into the soil.
If you don't want to make your own, we sell my favorite wooden planting ruler in the Gardenary Shop.


What About Pelleted Seeds?
Buying pelleted seeds can be a great option for those of you who have trouble handling smaller seeds. Many seed companies offer pelleted versions of smaller seeds like lettuces. Pelleted just means they're covered in little white clay-based coats to make them easier to both see and handle. Pelleted seeds show up very well against dark soil.
The one downside (besides the slight increased cost) is that pelleted seeds don't last as long. They need to be used up within one year. That shouldn't be a problem for small plants you can succession sow throughout the season, like lettuce.
Time to Direct Sow Some Seeds!
I'm so curious to know which hack is your favorite! (I'm betting it's the toilet paper one.)
Thanks for growing with me!

The 2025 Gardenary Seed Collection is LIVE!
Shop the entire collection now and get FREE SHIPPING on orders over $50!
Click on the image below to save this post for later!

