
At a Glance
- Learn the 9 essential steps to design, build, and fill your own productive raised-bed kitchen garden.
- Discover how to choose the best location, materials, and plants so your garden thrives in every season.
- Follow a proven step-by-step system that takes the overwhelm out of gardening and sets you up for long-term success.

Free Class! Plan Your 2026 Garden.
Save your spot and learn from Nicole! This masterclass gives you a simple, seasonal plan so you can grow with confidence. Learn how to plan, plant, and grow a garden, no matter your experience level.
9 Steps to Start Your Garden the Right Way
We did just about everything wrong when we started our first garden almost 15 years ago. We put so much work into a bad setup, and instead of getting baskets of cherry tomatoes like I'd dreamed, we got lessons in what not to do next time.
I eventually taught myself how to garden and, more importantly, how to set up a garden so that success was all but guaranteed. By 2015, I started a garden installation business that has designed, installed, and maintained hundreds of gardens.
With the knowledge I gained first from making all the mistakes and then by creating so many beautiful and productive gardens, I've broken the process of starting a garden into nine essential steps. I won't promise they're simple or easy. Several steps involve hard, even dirty work like clearing sod and shoveling soil.
But I will promise that the result of following these steps is a garden that'll be as beautiful as it is productive, without all the mistakes and frustration. This guide is your overview of the entire process. You'll find much more detailed step-by-step directions by visiting the article below each step.
Note: These steps mostly focus on setting up raised-bed kitchen gardens, but I do discuss creating in-ground spaces for vegetables and flowers, as well.
All right, if you're ready, grab some paper and a pencil. Roll up your sleeves. Let's get started.


Step One
Choose the Garden Location
This step is all about assessing your available space for a garden, and you really don't want to skip it, even if you only have a small area where your garden could go. Choosing the best location for your garden is actually the most important part of the process.
For this first step, you'll need a compass (or an app on your phone), a measuring tape, a pencil, and some paper (preferably graph paper if you can get it).
To assess your space, you'll first use a compass to determine the cardinal directions of your outdoor space. Find South if you're in the Northern Hemisphere (and find North if you're in the Southern Hemisphere).


Next, use your measuring tape to determine the length and the width of each space you have where a garden could go. Draw the dimensions on your paper and mark the directions.
Then, mark on your drawing where you have any tall structures like homes, trees, etc. Make note of available water sources like spigots.
You'll use this drawing to help you select a garden location that receives as much sunlight as possible (preferably unobstructed and from the South) and is located near a water source. Ideally, you'll pick the sunniest spot possible for your garden.
Click on the article below to find more detailed information about how to choose the best location for your garden.
Step Two
Create a Garden Design
Once you've settled on the garden location, it's time to plan out what you want your garden to look like.
Here are some essential components of a garden:
- Raised beds for production - If you plant to grow fruiting crops like tomatoes, cucumbers, beans, and zucchini, then raised beds will be essential. Learn more about why raised beds are critical to kitchen gardening.
- Pathways - The garden isn't just for plants. It's for you, too, so make sure you design it to be accessible. It should be easy to get to, walk through, and enjoy. Generally, you want a pathway to be about three feet wide so a wheelbarrow can go through.
- Perennial beds - This is a low-maintenance in-ground space where you can grow native plants and pollinator-friendly plants. You can also grow fruit trees and bushes and perennial veggies like asparagus, all of which can go directly in the ground.
Now that you know the different elements of your garden that will take up space, you can start putting pen to paper and drawing potential layouts. You can find my most-often-used garden layouts in the article below to help you design your own space. Just make sure you put some pen to paper before you move on to Step Three.
Step Three
Gather Your Materials
Once you've determined the best location for your dream garden and selected a layout and overall design, it's time to gather all your materials. Take the time to get everything you'll need before garden installation day. You don't want to be digging up your yard when you realize you don't have something. It ruins your momentum and causes delays.
Here are the materials you'll need to gather:
Raised Beds
If you're building and installing raised beds, select your raised bed material (wood, steel, stone, etc.). Measure the exact size you need each raised bed to be and order the raised bed kit or materials to build your own. Re-measure before you order to make sure you're getting the right number of wood boards, stone, etc.


Start your dream garden. Watch the free class!
Trellises
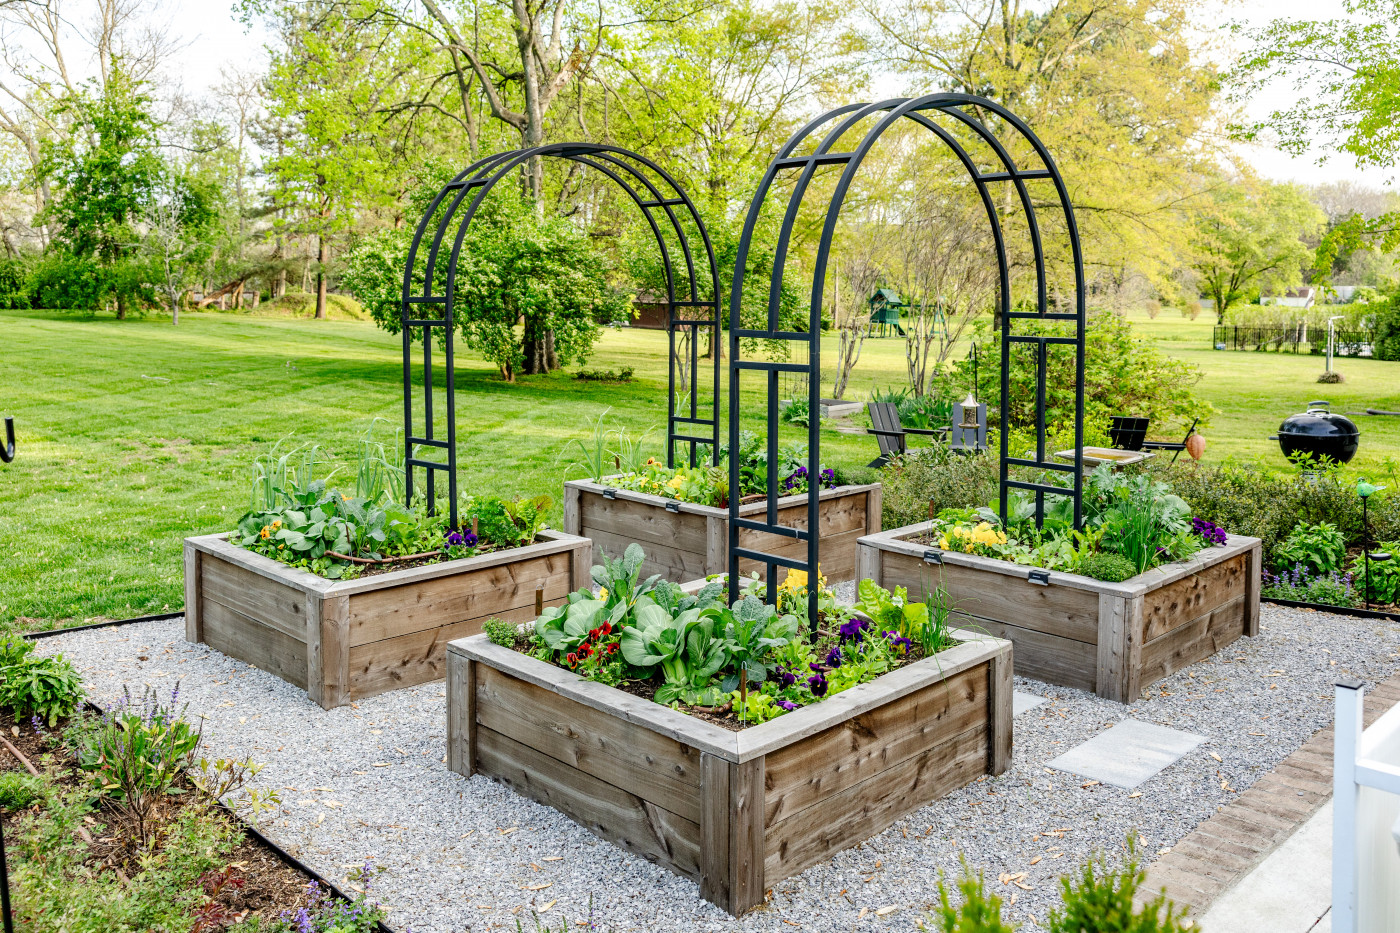
I use trellises in every single one of my garden designs. They double your growing space, keep plants healthier, and add a beautiful vertical element to your garden space. They're really form and function. My three favorite types of trellises to use are metal panels, obelisks, and arch trellises.
Panel trellises are ideal for growing down the middle or a bed or placing at the back of a raised bed that's up against a house or fence. If you want to grow perennial berries like raspberries or blackberries, giving them a panel even if you're growing them in the ground can help tame their wild growth. Obelisks are a great substitute for tomato cages and provide a structure for vining plants to climb in the middle of a raised bed. Arch trellises can connect two beds and create an inviting entrance to your garden space. Just don't put an arch across one raised bed; you'll end up shading most of your growing area.
Make sure to have your trellises bought and assembled before you add soil to your raised garden beds since retrofitting large trellises can be difficult.


Border Material
You'll want to divide your garden from your lawn and landscape with some kind of border material. I use steel edging in my garden designs because it looks elegant and is super durable. You can find it in the Gardenary shop or at your local hardware store. You can also use bricks, stone, or plastic edging. (I don't recommend plastic if you have an aggressive grass like bermuda.)


Pathway Material
You can keep grass in your garden pathways or add mulch or gravel. It's up to you and what feels comfortable to walk on. I love a small gravel like a pea gravel. It's easy to walk on and looks nice. Gravel also increases the durability of your raised beds because it dries quickly.
Then, if you'd like to have any kind of stepping stones in your pathways, make sure you have those ready to go for installation, as well.


This is the step where you spend all the money. I know those numbers add up quick (especially with the rising cost of lumber), but I promise you that making good decisions now can make the difference between having something that lasts a season or two and having something that stands the test of time.
Double check that you've got everything ready to go. Click on the article below for more information on the different garden materials and for help calculating how much material you'll need for each element of your garden.
Step Four
Build Your Raised Beds
I like to have wood and metal raised beds assembled before garden installation day. Stone and brick raised beds will be built as part of the garden installation (and I strongly recommend hiring a professional).
There are tons of wood and metal raised bed kits available online if you, like me, are more comfortable clicking "add to cart" than handling power tools.
Building your own raised beds from scratch can be one of the more challenging aspects of installing a garden, but I've got several different options depending on your comfort level with tools. You can construct a simple wood raised bed by asking the hardware store to cut your lumber for you and then connecting the sides with framing angles and decking screws. You can also add drainage holes and casters to the bottom of a water trough to turn it into a really simple, easy raised bed.
Click on the article below for step-by-step directions to build your raised beds.
Step Five
Install the Garden Structures
It's time to install the garden, and this is a great point to enlist some help from friends and family.
First, you'll use stakes and twine to mark out the garden space.
Then, you'll clear the area of all grass, weeds, and shrubs.
Next, you'll level the entire area. Depending on your terrain, this can be a labor-intensive but critical step.
Once your space is cleared and leveled, you'll put down some kind of base like carpenter paper to prevent weeds from growing in your garden.
After that, you'll frame the garden area with your edging material. You'll follow the twine you added to dig a trench along the entire perimeter.
Then come the raised beds. You'll measure and measure again to make sure they're spaced evenly and leveled.
It's time to fill your pathways with your chosen material, and finally, you'll set your trellises in place.
Click on the article below for more details on each part of the installation process.
Step Six
Fill Your Raised Beds with Great Soil
I recommend using a sandy loam soil for your vegetable garden. This can be ordered from a local nursery.
You want your soil to be well-draining and full of nutrients. When wet, it should hold its shape when you clasp it between your hands but not stick together like clay. This kind of soil will keep your plants healthy and productive.
When you're shoveling soil into your raised beds, make sure to protect the sides of your raised beds so they don't get dinged. You'll install your trellises before you add soil, unless your raised bed is 2 feet tall. In that case, you'll fill your bed halfway, install the trellis, and then finish adding soil. Fill your raised beds with soil all the way up to the tippy top.
Click on the article below to learn more about the ideal garden soil blend and how to calculate how much soil you'll need to fill your raised beds.
Step Seven
Select a Water Source
Before you finish installing your garden, decide if you'll be watering by hand, using garden ollas, or installing a drip irrigation system. There are tons of really simple drip irrigation kits that you can arrange on top of your soil and connect to a spigot. You can even add a timer to automate watering your garden. That's a great way to deliver consistent water to your vegetable garden.
Learn more about the different methods of watering your raised beds in the article below.
Step Eight
Understand Your Climate
The hard part is behind you now that your garden is all set up! But there's still work to be done to ensure you're filling your garden with plants that will grow and produce the way you want them to.
I've lived and gardened in five different climates. Just when I learned what I could grow and when in one spot, we'd move and I'd have to start all over. Eventually, I developed a system that could work no matter where I was growing. This system helps you make sense of the different growing seasons in your climate.
First, you'll record the average high and average low temperatures in your town for each and every single month. Then, you'll use those temps to help you categorize each month as being part of the cold season, cool season, warm season, or hot season. That'll give you a solid understanding of what you can expect your garden to look like throughout the entire year.
Click on the article below to learn more about figuring out your garden seasons for each and every month.
Step Nine
Pick Your Plants
Finally, we're at the plants. You may have felt impatient to skip past the structures and the installation process to get to the plants already, but trust me, a garden that's beautiful and productive happens when you follow the first eight steps. That's because your setup and timing really matter when it comes to your success. If you get the setup and the timing right, the plants mostly take care of themselves.
If you follow these steps, you'll have a great setup. To nail the timing, you just have to figure out which growing season you're in or about to be in and then fill your garden with plants that like to grow in that season.
Click the article below to learn more about your plant possibilities for each season.
Leaves, Roots & Fruit
Do you dream of stepping outside to harvest fresh herbs, crisp greens, or juicy tomatoes, right from your own backyard? In Leaves, Roots & Fruit, bestselling author and garden educator Nicole Johnsey Burke shares her proven framework to help any gardener—even beginners—grow fresh food all year long.

Those Are the 9 Steps to Starting Your Garden This Season
There you have it. Following these steps means doing a lot in a short amount of time: assessing your space, designing your garden, gathering your materials, building your raised beds, installing your garden, and filling it with plants that will thrive in your climate. I know all too well that starting a garden can be a daunting process. But it doesn't have to feel overwhelming if you take it step by step.
Be sure to grab my book, Kitchen Garden Revival, for more details on each step of this process, or enroll in Kitchen Garden Academy for tons of support while you start your garden the Gardenary way. And if you want someone who's been trained how to design and install gardens the way I do, you can find a Gardenary-certified consultant near you. They can come out to your space and help you complete each and every one of these steps.
I hope this guide helps you get set up and growing in your dream kitchen garden!
Get Help from a Gardenary Expert
Don't Miss a Step to Start Your Garden the Right Way!

