

Make Your Home & Garden More Sustainable by Composting
I'm sure you’ve been hearing about food waste lately. Here in America, we waste... a lot. In fact, the average American household throws away about $1,600 worth of food annually. Isn't that sad?
Even worse, most food scraps end up in landfills—piled underneath all of our other trash—where they can't break down naturally the way they would in a compost pile. They end up producing methane, a potent greenhouse gas. Food waste contributes a staggering 58% of methane emissions from municipal solid waste landfills.
One relatively easy but super impactful thing you can do at home is just save your food scraps and compost them. Composting is the process of breaking down organic matter into nutrient-rich material, and it has major climate benefits. It helps soil sequester carbon, keeps food out of landfills, and reduces nitrous oxide and carbon dioxide emissions into the atmosphere.
Composting is not only way better for the environment, it’s also a powerful tool for maintaining and enriching your garden soil over time. Composting is how you continuously replenish the nutrients in your soil, improve its structure, and feed the billions of microorganisms that keep it alive. For free!
Let's look at how composting works, the different methods you can use, and how to troubleshoot common issues. You'll learn exactly how to turn everyday kitchen and yard waste into one of the most valuable resources for your garden.


The Benefits of Composting
In nature, composting occurs continuously. When leaves fall in a forest, they decompose over time, enriching the soil with organic matter. By composting at home, we mimic this natural cycle, converting our organic waste into a free but incredibly valuable source of nutrients to support plant growth in our gardens. Plus, collecting scraps for composting reduces household waste and curbs those stinky trash smells.
In my book, Kitchen Garden Revival, I discuss the importance of organic matter in your soil. Compost is my favorite part of any soil blend, and it’s the amendment I add most regularly throughout the growing season. Let’s look briefly at the benefits of using compost in your garden:
- Helps soil retain water
- Improves drainage
- Increases air flow
- Stabilizes soil pH
- Prevents erosion
- Feeds essential microorganisms in the soil
- Provides key vitamins and minerals to plants, including both macronutrients (like nitrogen, phosphorus, and potassium) and micronutrients (like iron, zinc, and copper)
- Makes plants more productive

Adding compost, AKA “black gold”, to your garden is especially important because it introduces and supports beneficial microbes and organisms to help fight pests and disease. Regular topsoil, notably, does not have this capability, so compost is essential.
Not only are plants grown in compost-rich soil more productive and resilient, they also produce food that’s more nutrient-dense—thanks to the increased vitamins and minerals available to the plants—and, thus, healthier for you. Basically, compost is one of the best ways to feed your future food.
Now that you know why you need compost, let’s talk about how you can create it yourself.


Head's up: This post contains affiliate links. As an Amazon associate, I earn from qualifying purchases.
Different Composting Methods
There are lots of different ways to compost, from creating simple piles that are open to the elements, to setting up specialized systems for worms to make fast work of organic materials. All of the composting methods fall into one of the following categories: hot composting (e.g., compost tumblers); cold composting (e.g., buried piles), and vermicomposting (i.e., worm farms). I basically tried every different method before settling on one that worked for me.
Each method requires varying levels of supplies, effort, and time to give you the final product: compost. Let's look at some of the more popular methods, including the pros and cons of each, so you can decide which might be best for you and your space.
Compost Pile
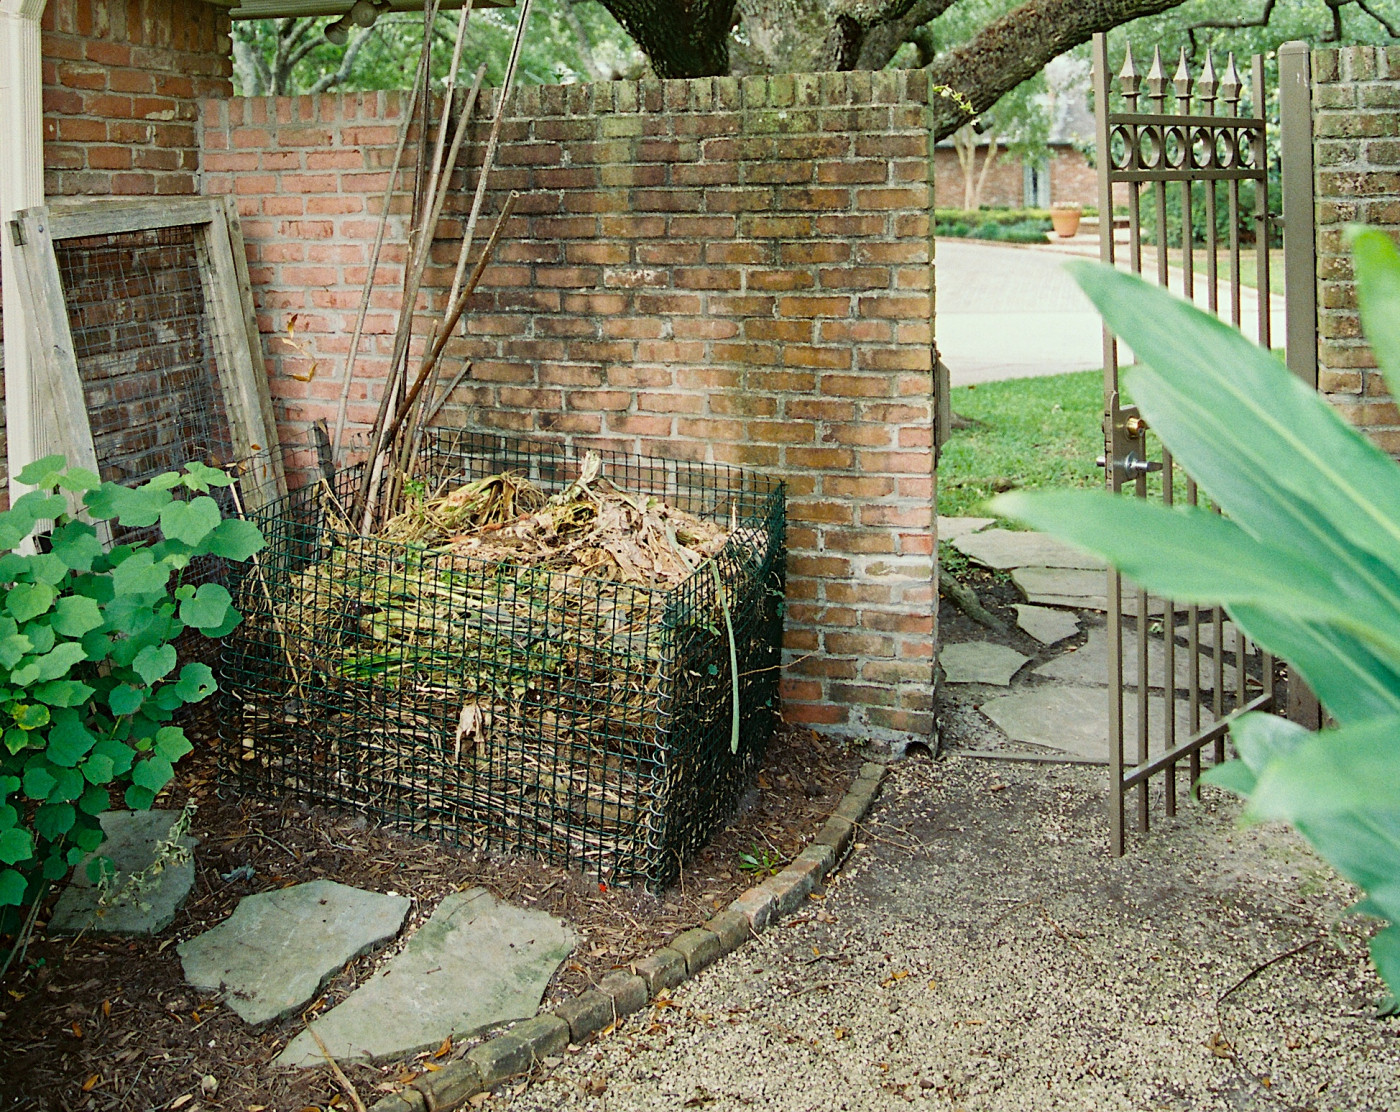
Making a DIY compost pile in your backyard is the cheapest and easiest way to start composting. This is how I got started. You simply make a compost pile right on top of your grass or dirt. You can leave your pile free-standing or build walls. I recommend wrapping some chicken wire around four wooden stakes to create a little pen. Other people use wood, bricks, or cinderblocks, but keep in mind that your pile needs airflow.
Technically, compost piles don't have to be turned, but "stirring" them with a shovel or pitchfork speeds up decomposition. The more often you turn your compost, the hotter it'll get and the faster it'll change into compost you can use in your garden. Compost piles need several months to break down, so you'll need to retire one pile and start adding materials to a new one before you can harvest any compost.
PROS
Like I said, this option is inexpensive, if not free (yay!). It also requires very little setup. You could go outside and start a compost pile right now.
CONS
Critters are always an issue with open piles if you’re not careful to tend your pile and add materials in the correct balance. I used this method in my first home and hosted cockroaches and rats. Even without the pests, the piles themselves often look unsightly.
Compost Bin
One step up from a compost pile would be to add your food scraps and yard waste to an enclosed space, like a compost bin with a lid, a compost bag, or a trashcan. Compost bins are stationary and help speed up the process by getting warmer inside than an open pile.
Having some kind of airflow in the container from vents or holes is key. You can turn the compost with a shovel or pitchfork, or just leave it be. The material at the bottom will be hotter and break down faster. Many compost bins have a sliding door near the bottom so you can harvest from the lower layers while still adding fresh materials to the top.
PROS
Compost bins hide their contents and don't take up very much space. You can find some great options for just $30 to $40.
CONS
Most compost bins are bottomless, so you'll need to be careful which type you buy if your composter will sit on concrete, a wood deck, or gravel. If your bin sits on the ground, pests might burrow from underground to get into your pile. I recommend placing some hardware cloth underneath your bin as prevention.


Compost Tumbler
Compost tumblers are above-ground barrels that make it easier to turn your pile. They run anywhere from $40 to $1,000, depending on the brand you get. This is the method I recommend for most of my clients.
The first tumbler I bought only had a single compartment. We kept adding scraps and cranking away, but we never let it rest. I ended up having to dump it all out when we moved. I highly recommend getting something with two chambers to prevent this issue. You can fill one side and then let it rest while you switch to the other side. You can find inexpensive dual-chamber tumblers made of plastic.
I splurged on a Jora dual-chamber composter as a birthday present to myself. It’s made of metal and has insulation to keep my compost hot, which means it turns into organic matter faster. It also has an adjustable lock and a handle for turning.
PROS
You can place a compost barrel on a patio or balcony. They don't take up much room at all, and the contents of your compost are out of sight. All you have to do is turn your tumbler every couple of days.
CONS
This method is a bit slower, but you can keep things moving by adding scraps in larger batches and turning it regularly. Turning your compost can be a bit of an arm workout, especially once the chambers are full.
Electric Food Processors
If you're on social media, I'm sure you've seen ads for products like the Lomi home composter or the Mill food recycler. They're marketed as overnight composters, but they're actually electric dehydrators. That means the final result isn't compost. It's just food scraps that have been dehydrated and then ground up.
Electric food processors range in size from a countertop unit to something the size of a large trash can.
PROS
If you live in an apartment and don't feel comfortable having a compost bin, using an electric food processor is a great way to reduce your household waste and avoid having stinky kitchen scraps in your trash.
CONS
Electric food processors are pretty expensive (the standard Lomi costs $395). Plus, these are electronic devices, so we have to consider the environmental impact of using electricity to speed up a natural process.


Vermicomposting
Vermicomposting is composting with worms to produce worm castings. The end product is rich in plant-available nutrients and beneficial microorganisms, so it’ll enhance your soil fertility and structure the same way compost does.
PROS
You can produce worm castings in as little as 2 to 3 months. This is one of the best methods for those of you short on outdoor space, as it’s easy to keep a worm bin indoors. All you need is a small container or bin.
Cons
You have to be reasonably comfortable handling worms and monitoring their living conditions, like the moisture in their bedding material and their food availability. Also, unwanted pests, like mites, can sometimes disrupt the composting process and impact the quality of the vermicompost.
There might be an initial investment for the bin, worms, and bedding material, though you can also repurpose items around your home to make the worm home.
Bokashi Method
This method involves fermenting food scraps to break them down. To start off, you’ll add an inoculated, microbe-laden bran (available at some garden supply stores or online) to your organic material in a bucket. Traditionally, you’d bury the materials in a deep hole to complete the composting process. Nowadays, you can buy airtight bokashi kits that simulate anaerobic conditions right inside your home. After about a month, you’ll have pre-compost.
PROS
Since this method is pretty fast, you’ll have compost in about 6 weeks (that’s 2 weeks for fermentation and 4 weeks “underground”). It can break down things that would normally take a long time or that you wouldn’t consider putting in a compost pile, like bones, meat, and cooked foods.
CONS
Unless you have lots of yard space to bury your bokashi, you’ll be limited to what you can fit inside a bokashi compost bin. That means you’ll likely need to stick with food waste. It also can get a little smelly.
Another con: fermented bokashi is pretty acidic (its pH is between 3.0 and 4.0). It needs to neutralize in the soil before supporting plant life. Most people bury the pre-compost in a garden trench or add it to a traditional compost heap for further breakdown.


How to Choose a Composting Method
There are several different factors to consider when choosing the best composting method for you: your space constraints, how active you want to be in the composting process, and how much organic waste you need to produce for your garden, among others.
To help you narrow your decision, here are a few questions to keep in mind:
Do you have yard space?
If you have outdoor space, you have more options. You can choose to go with an above-ground method (like a pile, a bin, or a tumbler) or an underground method (like a buried pile). Above-ground composters can sit on top of your existing lawn or be freestanding. You can build your own with simple materials you probably have lying around, or you can buy a container to keep scraps out of sight.
If you don’t have outdoor space, then you’re more limited. You’ll need to assess your comfort level with handling worms or having something that could potentially grow smelly in your home.
Do you want to use the resulting compost?
If you don’t need to use the compost you make for your garden, then you could simply drop off your food scraps at a community garden or municipal compost program (or arrange to have them picked up).
Are you in a hurry to use finished compost?
If you’re not in a hurry, you can use simpler methods like cool, or passive, composting. This hands-off approach involves setting organic materials aside and allowing them to break down slowly, over the next 1 to 2 years.
For those of you who’d like to use your compost within the next 6 months or so, you’ll want to stick with hot, or active, composting. The time to results for hot compost depends on what you’re composting, how often you’re turning your pile, your climate, etc.
How active do you want to be?
There are tasks you can perform regularly to speed up decomposition, depending on which method you go with. If you set up a pile or tumbler, for example, then turning it regularly helps it heat up and therefore break down faster.
Which Compost Method Is Best for Those with Limited Outdoor Space?


Hot vs. Cold Composting
Not all composting happens at the same speed, and the method you choose depends on how quickly you want results and how much effort you’re willing to put in. Hot composting is a faster, more active process that generates heat as organic matter breaks down, while cold composting is a slower, more passive method that takes longer but requires minimal effort. Both methods produce nutrient-rich compost.
Hot Composting
Hot composting is a type of aerobic composting, meaning the compost pile needs oxygen to break down. Microbial activity will heat the pile up between 130°F (54.4°C) to 160°F (71.1°C). This process allows organic material to decompose quickly. To achieve and maintain these high temperatures, you need the right mix of materials, proper moisture levels, and regular turning to keep oxygen flowing. The heat will kill most weed seeds and pathogens.
Cold Composting
Cold composting, on the other hand, is usually anaerobic, meaning it can occur in a closed space underground, like a trench or pile. This is the “set it and forget it” approach, but since it doesn’t produce as much heat, it takes much longer (1 to 2 years). Cold composting doesn’t require turning or careful layering, so it’s ideal for gardeners who want an easy way to recycle kitchen scraps and yard waste without much effort. However, because temperatures stay lower, weed seeds and harmful bacteria may survive.
If you want finished compost quickly and don’t mind managing the process, hot composting is the way to go. It’s great for gardeners who need a steady supply of nutrient-rich compost. However, if you’re looking for a low-maintenance way to compost, cold composting might be a better fit.

There are no mistakes in compost, there is only learning. I always encourage people to just start and observe, and you’ll be amazed at what you can do.
How to Make Compost
Now that you’ve chosen your method, it’s time to get to work actually making compost. In this post, we'll focus on composting in a pile, bin, or tumbler. Let's look at how to set up a simple system, what materials to add (and, just as important, what to avoid), how to maintain a compost pile, and how to tell when compost is ready to be used in your garden.
How to Set Up a Compost Pile
A compost pile is the simplest way to get started. While you can literally pile up compost materials in a corner of your yard, I recommend building a simple wire cage to contain all your food scraps as they break down. Follow these steps:
- CREATE FRAME: Spread 4 wooden stakes out to form four corners of your cage, using a hammer or mallet to secure them in the ground. You can make your cage as small or large as you need.
- WRAP THE WIRE: Wrap chicken wire around one of the stakes. Chicken wire will naturally coil inward and grip the stake. Unspool your wire to wrap around the outside of each stake.
- FINISH IT OFF: Once you make it back to the beginning of the cage, trim the wire with wire cutters. Bend the trimmed edges inward to secure the wire to the cage. Use zip ties if needed for added security.

How to Build a Compost Bin
Having a compost bin makes the composting process cleaner, more efficient, and easier to manage. A dedicated bin (or two) helps keep things organized, improves aeration, and speeds up decomposition.
Follow these steps to set up your compost bin:
- CHOOSE YOUR COMPOST BIN STYLE: Decide what kind of compost bin works best for your space and needs (i.e., a wooden pallet bin, a plastic bin, or a three-bin system).
- ASSEMBLE THE BIN: For a simple pallet bin, stand three wooden pallets upright to form a U-shape and secure them together with screws or zip ties. Leave the front open for easy access or attach a fourth pallet with hinges as a gate. For a wooden bin, build a 3-sided frame using untreated wood, leaving gaps for airflow. Add a removable or slatted front panel to easily turn compost.
- CHOOSE THE RIGHT LOCATION: Place your bin in a well-draining area with partial sun. Too much shade will slow decomposition, while too much sun can dry out materials. Ensure it’s close enough for easy access but not too close to your house if you’re worried about smells or pests.
Building a compost pile or bin doesn’t have to be complicated, and once you have one in place, you’ll have a continuous supply of organic matter to enrich your soil. Now that you know how to set it up, let’s go over the best materials to add (and what to avoid!) to keep your compost thriving.
What Goes into Your Compost Bin: Greens vs Browns
Compost needs four things to break down: nitrogen, carbon, air, and water. The trick to compost that stays active without getting smelly or disgusting is having the right balance between these four things.
From day one, you'll need to maintain roughly a 3:1 carbon to nitrogen ratio. Basically, every time you add nitrogen to your pile, you should add three times as much carbon. This is how you prevent bad odors and keep your pile productive.
Here's an easy way to remember what's a nitrogen product or a carbon product. Nitrogen products are often green (think grass clippings and cucumber skins), while carbon products are normally brown (think cardboard). These two types of organic matter break down at different rates and provide different benefits to the compost pile.
Nitrogen-Rich Materials (Greens)
- Fruit scraps (no citrus)
- Vegetable scraps (no onion or garlic peels)
- Herbs
- Eggshells
- Coffee grounds
- Tea bags and used tea leaves
- Fresh grass clippings
- Fresh leaves and plant trimmings (no seeds)
- Manure from animals like rabbits, chickens, hamsters, etc.
- Seaweed and kelp
- Weeds (before they go to seed)
- Food scraps like rice, pasta, and bread (in moderation)
- Alfalfa meal


Carbon-Rich Materials (Browns)
- Wood chips
- Dried leaves
- Dried plant products (no weeds or seeds)
- Straw or hay
- Paper (colorless, no glossy ink)
- Paper towels and napkins (if not greasy)
- Shredded newspaper and cardboard (no glossy ink or tape)
- Sawdust or wood shavings (untreated wood only)
- Wood ash
- Old topsoil
- Nut shells
- Pine needles (in moderation)
- Egg cartons (cardboard only)
- Twigs and small branches


A well-balanced compost pile has enough greens to provide microbes with nitrogen for growth and enough browns to keep the pile from becoming too wet or compacted. Browns basically help maintain airflow and prevent everything from becoming a smelly, soggy mess.
That’s why you need significantly more brown materials than green. You don’t need to measure your components exactly. Just aim for roughly 3 to 4 handfuls of browns for every handful of greens you toss in. When I first started, I found I was producing way more nitrogen-rich materials than carbon-rich ones. So I made it a point to gather fallen leaves in the fall and save them for times when I was adding food scraps.
You’ll know you’re not quite getting the balance right if your compost pile smells bad (which can happen with too much green material) or is taking forever to break down (which can happen with too much brown material). If your pile is getting slimy and smelly, add more browns. If it’s dry and not decomposing, add more greens and moisture.
Pro Tip:
Make the pieces you add as small as possible, especially the browns. Paper and cardboard should be shredded or ripped up. The smaller, the better; it takes a while for these things to break down.


Easy Compost Materials Reference List


What NOT to Compost
Don't put anything into your pile that will take years and years to break down, that might cause disease or contaminate your compost, or that might attract pests and animals. Weeds that have been treated with pesticides or that have started flowering are a no-go. You want to avoid adding any seeds to your pile, so that also goes for reject fruits and spent flowers from your garden.
You’ll also want to skip bags and utensils that say they’re compostable. Most home composting piles just don’t get hot enough to break these items down. They’re really only compostable in industrial systems.
Here's your list of things that shouldn't be composted:
- Pesticide-treated grass or plants
- Diseased plants
- Weeds and seeds
- Large branches
- Construction debris
- Cheese or dairy products
- Oils and fats
- Citrus peels
- Onion and garlic peels
- Meat, fish, or other animal products (except rinsed eggshells)
- Poop from animals that eat meat (e.g., dogs and cats)
- Colored or glossy paper
- Plastic, metal, or glass
- Coal or charcoal
- Compostable plastic


Tips to Collect Kitchen Compost
Since the majority of your green materials will likely come from food scraps, it’s a good idea to keep a little container or pail in your kitchen (perhaps even by or under your kitchen sink) to collect fruit and veggie parts. I recommend using something with a top or lid. Otherwise, you can end up with fungus gnats and fruit flies. You can, however, skip the liner or just use a paper bag. If you do want a liner, it’s best to keep it out of your compost pile when you’re done with it, even if it says it’s compostable.
I bought a compost collector bin from Amazon. It has a lid filter that I can change out to prevent smells, and it’s attractive enough to sit right on my kitchen counter. I just fill it up throughout the day—stems from kale for my green smoothie, apple cores, banana peels, coffee grounds, etc. By the end of the day, it’s usually pretty full, so I run it outside to my compost tumbler, which is on the side of the house, every night after doing the dishes.
Here’s where collecting fallen leaves comes in handy. As I’m adding these food scraps, I can take a couple scoops of leaves and add them to the composter, as well, to maintain the balance between greens and browns.


How to Maintain a Compost Pile
Now that you’ve built your compost bin or installed your tumbler and started adding materials, the real magic begins. Composting is a natural process, yes, but it still requires a little attention to keep things moving efficiently. Your food scraps and yard waste should give you all your nitrogen and carbon, so you’re just missing air and water. That’s why your first two tasks will be aerating and watering your pile.
Aerating Your Compost Pile
When I first started gardening, we received a free plastic composter tower from our city. We popped it underneath our deck and loaded it with food scraps, rarely bothering to turn it. When it came time to move one year later, we pulled out the tower, only to find there was a lot of food inside that hadn’t decomposed. We ended up burying the scraps.
Turning your compost regularly speeds up decomposition by adding more oxygen, which helps microbes break down materials faster. A good rule of thumb is to turn your compost at least every week. I turn my compost about every other time I add something. A study found that tumblers turned twice a week had higher temps and faster decomposition than those turned just once a week or every other week.
Tumblers with handles are great because you can just simply turn the handle. (Even so, if you have a lot of materials inside, those things can get pretty hard to turn. Prepare for an arm workout!) If you’re composting in a pile or stationary bin, use a garden fork or shovel to flip the outside material toward the center.
If you’re hot composting, aeration helps maintain high temperatures (130 to 160°F), which kill weed seeds and pathogens. Cold composting requires less turning, but mixing it occasionally still helps speed things up.
Watering Your Compost Pile
Your compost should stay moist but not soaking, like a wrung-out sponge. Water your compost pile about once a week. I’ve found that things like coffee grounds and spoiled fruits typically add enough water to enclosed systems to last a couple of days. You can always test the moisture by grabbing a handful of compost and seeing if it feels too wet.
Maintaining Your Greens and Browns
For every handful of food scraps (greens), toss in 3 to 4 handfuls of shredded cardboard or dry or woody plant material (browns) to maintain your ratio. If your pile is open, make sure to layer plenty of browns over food scraps to avoid attracting critters.
Remember, your compost will break down faster if you prep any food scraps and yard waste before you add them. Chop, tear, and shred things into the smallest possible pieces. This makes it easier for microbes to access them and helps avoid stinky odors.
Letting Your Compost Finish
One thing to keep in mind is that your compost will never be “done” if you’re continuously adding and adding and adding. This is why I love dual-chamber tumblers and bins with more than one compartment. You can leave one space to finish up while you add new materials to a different space.
Elevate your backyard veggie patch into a sophisticated and stylish work of art
Consider this your modern guide to setting up and planting an edible garden that's not only productive, but beautiful, too. Kitchen Garden Revival will forever change the way you think about growing a little bit of your own food.
How to Fix Common Compost Issues
"Many people worry that it will smell or attract pests," says Danielle Boss of Summer Skye Gardens, our composting expert here at Gardenary, "but if you do it correctly, it won’t. Well-made compost has a rich, earthy smell and looks like very dark soil, hence the name 'black gold'."
Here are some problems you might run into. Don't worry—pretty much everything is fixable!
Pile Starts to Smell Bad
You shouldn't have to pinch your nose when you approach your compost pile. A healthy pile should smell like rich soil. So if it's stinky, that's a sign you've either added something you shouldn't have to the pile (like meat) or you've added too many greens. The simplest solution is to add more brown products like dried leaves or cardboard to balance it out.
Note: Fix stinky compost ASAP to avoid attracting pests and animals.
Compost Too Wet
If your compost is a little too wet—which is likely to happen if you have an open pile during rainy weather—add more brown products like dried leaves. While you want compost to be kept moist, you know you need more brown material if you see water drips along the edges.
Pile Taking Too Long
It's normal for compost to take at least 3 to 6 months to break down. You'll also notice a significant difference in warmer temps, when decomposition speeds up, compared to colder temps, when decomposition slows down. (I mean, that's why we have refrigerators, right?)
If you feel like things have stalled, make sure you're adding green material, keeping your pile moist, and turning it weekly. You can also buy compost starters, which can help pick the pace back up. If you don't want to buy anything, natural compost accelerators include things like grass clippings, blood meal, coffee grounds, and urine. That's right, I said urine. Turns out your pee is a great source of nitrogen, plus potassium and phosphate.
Compost Attracting Bugs
Don't freak out, but it's normal to have some creatures living in your compost pile. You'll have worms (obviously) if you're vermicomposting, but regular piles can become home to things like maggots, roaches, and mites.
I was really worried about cockroaches when I started composting, but the most common bugs I see in my own pile are the larvae of soldier flies (they look like extra-long roly-polies, AKA pill bugs). It grossed me out at first, until I learned they're helping the pile break down faster. Now, I look forward to adding kitchen scraps I know they'll enjoy. (One day you're young and carefree, and the next you're saving watermelon rinds for the bugs in your compost pile.)
You don't even need to worry about removing these good bugs before adding compost to your garden. They're great for your soil (and the birds that visit your garden).
You only need to troubleshoot if you see "bad" bugs in your compost. These include slugs, ants, spiders, bees, flies, and centipedes. They're likely drawn to your pile because it's too stinky or too wet, so add more brown materials.
Compost Attracting Animals
This issue is most common with open piles and bins. To avoid attracting animals, don’t put things like meat scraps in your pile. Bury food scraps in the center and then top them off with a layer of browns like dried leaves or shredded cardboard.


How Do You Know When Compost Is Done?
Compost takes anywhere from 3 months to a year to break down, depending on the method you're using (hot versus cold composting), the materials you've added, and the weather. Over time, the contents of your pile will shrink as the organic materials inside are broken down and turned into soil.
Finished compost is dark and crumbly—it looks a lot like soil. It also has an earthy smell, like the forest floor. If your compost has any kind of unpleasant odor, it's not ready yet. Boss recommends doing a quick radish seed test with a bit of your compost. Since radish seeds germinate quickly, you'll know your compost is good to go if at least 75% of your radish seeds sprout in the compost.
You'll likely find your compost still has some larger pieces that haven't broken down yet, especially if you've tossed in things like avocado pits and skins. I pull these large pieces out and toss them into the other side of my tumbler to continue breaking down.
A wheelbarrow or garden cart, as well as a pitchfork or shovel, can help when you’re harvesting or transporting your compost. You may want to sift compost with a wire screen onto a tarp below and add larger scraps back into your pile. Sifting prevents compost from clumping up and helps you remove any large chunks that would look like trash in your garden bed.
Pro Tip:
I recommend saving a handful or two of finished compost and using it to speed up the next batch. Compost, as you know, has microbes that will start to break down organic materials and get the process going much faster. This is like using a sourdough starter or dividing a SCOBY when making kombucha.
How to Use Finished Compost in Your Garden
Now that you have rich, dark compost ready to use, the next step is incorporating it into your soil for maximum benefit. Remember, don’t think of compost as just a fertilizer—it’s a soil conditioner, moisture regulator, and microbial powerhouse that improves soil structure and boosts plant health.
Whether you’re refreshing container soil, building a new raised bed, or preparing your garden for another growing season, adding compost will supercharge your soil with essential nutrients and beneficial microorganisms.
Here are different ways to use finished compost in your garden:
- MIX COMPOST INTO GARDEN BEDS: For in-ground gardens, work 2 to 4 inches of compost into the top 6 to 8 inches of soil before planting. This helps improve drainage in clay-heavy soil and increases water retention in sandy soil. If your soil is particularly depleted, you can add up to 6 inches of compost to rebuild fertility over time. Once mixed in, compost continues to break down, releasing nutrients slowly and feeding the microbial life that keeps soil healthy.
- TOP-DRESS ESTABLISHED PLANTS: If you already have plants growing, you don’t need to dig compost into the soil—you can top-dress instead. Simply use a compost spreader to spread ½ to 1 inch of compost around the base of plants, being careful not to pile it against stems or trunks. This acts as a slow-release fertilizer, delivering nutrients directly to plant roots as water filters through. It also improves soil structure and reduces compaction without disturbing plant roots.
- USE COMPOST IN THE 103 SOIL BLEND FOR CONTAINERS & RAISED BEDS: Mix compost with equal parts topsoil and coarse sand (plus a dash of worm castings) to create Gardenary’s 103 soil blend. This blend can be used in raised beds and containers. If you’re starting off with potting soil for containers or pots, mix compost at a ratio of about 1 part compost to 2 parts soil. Compost helps prevent soil from becoming too dense in containers, improving aeration and water retention. If reusing old potting soil, refresh it by mixing in 25 to 50% compost to replenish lost nutrients and microbial life.
- MAKE COMPOST TEA FOR A LIQUID BOOST: If you want a fast-acting nutrient boost, you can make compost tea by steeping finished compost in water for 24 to 48 hours. Strain the liquid and use it to water plants or spray on leaves as a foliar feed, providing an instant dose of beneficial microbes and nutrients. This is a great way to introduce compost benefits without disturbing the soil.
By using compost in these ways, your soil will stay healthy and productive long-term. Compost doesn’t just feed your plants—it builds living soil that supports a thriving garden season after season.


Composting FAQs
Can I put eggshells into my compost pile?
Eggshells are great for your compost pile and garden thanks to the calcium they contain. That being said, eggshells take a really long time to break down, typically a year or more. That's why experts recommend rinsing and drying your eggshells and then grinding them up before adding them. You can grind them the old fashion way with a mortar and pestle, or blitz them in your food processor.
Don't worry about salmonella. A hot compost pile that reaches temperatures above 130°F can take care of salmonella and other harmful bacteria. If you’re worried, you can also bake the eggshells in the oven first to kill any bacteria before adding them to your compost.
Can I put garlic and onions in my compost pile?
Garlic and onions are bad for your compost pile for the same reason they're wonderful for your garden: their smell deters pests. We don't want pests hanging out in our gardens, feasting on all our kale leaves. But we do want some “pests” living in our compost piles to help break down all our kitchen scraps. So we avoid adding things we know they won't like.
Can I put citrus peels in my compost pile?
Avoid adding citrus for the same reason as onions and garlic. The citric acid in your orange peel isn't great for the many different microorganisms and bugs that live in your pile.
Can I add weeds to my compost pile?
Weeds are fine, unless they've, one, been treated with pesticides or herbicides and, two, started flowering. You want to avoid adding any seeds to your pile, so that also goes for reject fruits and spent flowers from your garden. Not only can these seeds sprout in your pile, they can also sprout later, when you spread your compost throughout your beds.


What's the difference between compost and topsoil?
Compost adds beneficial microbes and organisms to the soil, and these little guys help your plants fight pests and disease. Topsoil does not add these beneficial organisms.
What's the difference between compost and fertilizer?
One of the main differences is that compost improves the structure of the soil, as well as the water retention, whereas fertilizer does not. Synthetic fertilizers can actually strip your soil of valuable nutrients and harm beneficial microbes.
What's the difference between compost and mulch?
Compost is a type of mulch that's often mixed into the soil or spread over the surface. Mulch is typically just spread on top of the soil. Both can improve the soil and bring many benefits to the garden, but I typically just use compost and avoid other types of mulch.
Does compost turn into soil?
Compost doesn't become soil on its own, but it is a key component of my 103 Soil Blend. Adding compost to soil is the best way to build soil health and fertility. Since compost doesn't have great structure on its own, you'd rarely want to grow something in just compost. Compost mixed into topsoil, however, is a great growing medium for many vegetables.
How long does compost take to break down?
The time it takes for compost to fully break down depends on which system you're using and how well you're managing that system. A well-managed pile can be ready to use in your garden in just 3 to 6 months, assuming materials are shredded and turned regularly. Unattended piles with large pieces of material can take a year or more to break down.
Time to Make Your Own Compost!
To me, there’s something magical about turning your food scraps into organic matter for your garden. Not just any matter, but the most nutrient-dense food you can give to your fruits and veggies.
You don’t have to buy any plastic bags or drive to the garden center. You don’t have to order any delivery trucks to your house. You simply make your own. It’s a full cycle—you take produce you’ve grown in your garden (or couldn’t use from the grocery store), and you turn it into a product you can put right back into your garden. Then you start the process all over again. You keep providing nutrients and growing more nutrient-rich food. If that's not sustainable, I don't know what is.
Honestly, the more years I spend in the garden, the more amazed I am at the wonders of nature, especially the way it takes care of itself by coming full circle. Along the way, it provides for us in so many ways, as well. It even takes care of our waste for us!
Now, I’m off to find some leaves to help turn my gooey mess into compost.
Learn the Gardenary Soil Method
Get the step by step to create, maintain, and enhance your own organic garden soil inside Gardenary's Soil School.

Additional Reading & Resources
There are tons of books, online resources, and classes you can take to learn more about composting.
HERE are some products I recommend for composting at home, including using the bokashi method and vermicomposting.
Here are some composting books I recommend:
Learn More About Your Garden Soil
Sources:
- New York Times: How to Start Composting
- United States Environmental Protection Agency (EPA): Composting Food Waste and Quantifying Methane Emissions from Landfilled Food Waste
Click on the image below to save this post for later!

